
this is it folks. my very first daring bakers challenge. and um, seriously, they were not kidding. this was both incredibly daring and a challenge. i mean, holy crap. the recipe is about 4 miles long, involves jelly roll pans (which i didnt know existed until this challenge), and lots and lots and lots of layers and syrupy bits. it is totally worth it though, let me tell you. my coworkers kind of think i’m awesome now. so, bonus!
this opera cake of doom was the devious idea of daring baker co-founders lis (la mia cucina) and ivonne (cream puffs in venice) with the help of fran (apples peaches pumpkin pie) and shea (whiskful). i like to imagine them coming together (dragging a lame/club foot behind them), fingers rubbing creepily together, and nasally whispering, “how best to try these so-called daring bakers?” “ah ha! an opera cake! and not just any opera cake, but one that can only be light in color. no chocolate! or darkness!” (i know, no darkness seems out of character for this evil story i am spinning)
weird story segue aside… because it is spring/summer (too bad no one has informed boston yet), our co-hosts (who i am sure are all very sweet and not igor-like at all) decided to go with an opera cake that is light in flavor and color. that being the case, i decided to use an orange zest buttercream and orange blossom water glaze. i have been racking my brain/the internet for things to do with my orange blossom water, which has been sitting in my cupboards since a previous baking experiment, and came to the conclusion that now was the time. granted, i still have pretty much the entire bottle left despite using it for this recipe. (note to readers… any orange blossom water baking ideas?)
now… on to the baking. get ready. you might want to take a deep breath.
the joconde:

what you’ll need:
6 large egg whites, at room temperature
2 tbsp. white sugar
2 cups almond meal 2 cups icing sugar, sifted
6 large eggs
½ cup all-purpose flour
3 tbsp. unsalted butter, melted and cooled
1. divide the oven into thirds by positioning a rack in the upper third of the oven and the lower third of the oven. preheat the oven to 425◦f.
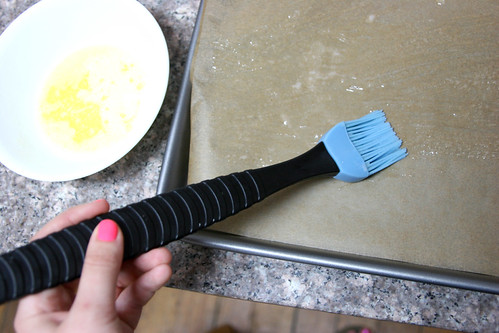
3. line two 12½ x 15½- inch (31 x 39-cm) jelly-roll pans with parchment paper and brush with melted butter. (i couldn’t find any pans that size so i used two 12×17. it just makes the cake a bit thinner… and you have to cut things down later when assembling.)
4. beat the egg whites with a hand-held mixer (with whisk attachment) until they form soft peaks. add the granulated sugar and beat until the peaks are stiff and glossy.

(loooookin’ good!)

(why, what adorable little peaks you have.)
5. grab a second bowl. attach the paddle attachment to the mixer and beat the almonds, icing sugar and eggs on medium speed until light and voluminous, about 3 minutes. (i don’t have a paddle attachment, and don’t even know where to find one… so i used the whisks, then grabbed my own paddle thingamajig (aka a spatula) and just pretended it was a paddle attachment… i know, awful.)
6. add the flour and beat on low speed until the flour is just combined (be very careful not to overmix here!!!).
7. using a rubber spatula, gently fold the meringue into the almond mixture and then fold in the melted butter.

divide the batter between the pans and spread it evenly to cover the entire surface of each pan.
8. bake the cake layers until they are lightly browned and just springy to the touch. this could take anywhere from 5 to 9 minutes depending on your oven. place one jelly-roll pan in the middle of the oven and the second jelly-roll pan in the bottom third of the oven.
9. put the pans on a heatproof counter and run a sharp knife along the edges of the cake to loosen it from the pan. cover each with a sheet of parchment or wax paper, turn the pans over, and unmold.
10. carefully peel away the parchment, then turn the parchment over and use it to cover the cakes. let the cakes cool to room temperature.

on to the syrup!

what you’ll need:
½ cup (125 grams) water
⅓ cup (65 grams) granulated sugar
1 to 2 tbsp. vanilla extract
1. stir all the syrup ingredients together in the saucepan and bring to a boil.

2. remove from the heat and let cool to room temperature.
that was easy enough… now, the buttercream:

what you’ll need:
1 cup (100 grams) granulated sugar
¼ cup (60 grams) water
1 tbsp. pure vanilla extract
1 large egg
1 large egg yolk
1¾ sticks (7 ounces; 200 grams) unsalted butter, at room temperature
1/3 of medium orange zest
1. combine the sugar, water and extract in a small saucepan and warm over medium heat just until the sugar dissolves.
2. continue to cook, without stirring, until the syrup reaches 225◦F (107◦C) on a candy or instant-read thermometer. once it reaches that temperature, remove the syrup from the heat.

3. while the syrup is heating, begin whisking the egg and egg yolk at high speed in the bowl of your mixer using the whisk attachment. whisk them until they are pale and foamy.
4. when the sugar syrup reaches the correct temperature and you remove it from the heat, reduce the mixer speed to low speed and begin slowly (very slowly) pouring the syrup down the side of the bowl being very careful not to splatter the syrup into the path of the whisk attachment. some of the syrup will spin onto the sides of the bowl but don’t worry about this and don’t try to stir it into the mixture as it will harden!

5. raise the speed to medium-high and continue beating until the eggs are thick and satiny and the mixture is cool to the touch (about 5 minutes or so).
6. while the egg mixture is beating, place the softened butter in a bowl and mash it with a spatula until you have a soft creamy mass.
7. with the mixer on medium speed, begin adding in two-tablespoon chunks. when all the butter has been incorporated, raise the mixer speed to high and beat until the buttercream is thick and shiny.
8. at this point add in the orange zest and beat for an additional minute or so.
9. refrigerate the buttercream, stirring it often, until it’s set enough (firm enough) to spread when topped with a layer of cake (about 20 minutes). rather than sit around and wait… i decided to go to the movies with my roommate..in our pajamas. because we are cool like that. and then stuck my other lamer roommate (kidding, love you m!) on stirring duty.

(i couldn’t quite figure out how to wrap up my joconde due to its long thin shape… so seran wrapping the entire table seemed like my best bet.)
once i returned, after having a good cry at made of honor, (le sigh patty d. patrick dempsey and i are so chummy i can call him patty d.) i began the glaze. usually there is also a mousse or ganache involved. but i opted out since i couldn’t quite figure out how to do it without using white chocolate. and i haaaaate white chocolate. plus, i was already putting forth a lot of effort on this challenge. i didn’t want to explode or anything.

what you’ll need:
1/4 tsp. pure vanilla extract
1 cup powdered sugar
2 tablespoons milk
1 tsp. orange blossom water (pretty much just do it to taste)
1. combine ingredients, mix until smooth.

2. let stand for 5 minutes. (but you want to make this right before you glaze the cake. i let it sit over night and it came out all wuckawucka. don’t be like me. listen to the insturction masters.)
the assembly! (finally!!)
gather the troops…

1. line a baking sheet with parchment or wax paper. (i totally forgot to do this. typical. i recommend that you do remember.)
2. working with one sheet of cake at a time, cut and trim each sheet so that you have two pieces (from each cake so you’ll have four pieces in total): one 10-inch (25-cm) square and one 10 x 5-inch (25 x 12½-cm) rectangle.
3. place one square of cake on the baking sheet and moisten it gently with the flavoured syrup.

(also, just so you know, it’s pretty tricky to photograph and moisten at the same time.)
4. spread about one-third of the buttercream over this layer.

5. top with the two rectangular pieces of cake, placing them side by side to form a square. moisten these pieces with the flavoured syrup.

(woops. definitely didn’t trim it to size. don’t tell anyone. got that internet?)
6. spread another third of the buttercream on the cake and then top with the third square of joconde. use the remaining syrup to wet the joconde. spread the remaining buttercream on top of the final layer of joconde and then refrigerate until very firm (at least half an hour).
7. at this point i decided that the cake seemed a little short… i didn’t want it to get a complex, so i cut the cake in half and put one on top of the other. so now it has 6 lovely layers and feels tall and pretty.
8. make the glaze (cough, pull it out of the fridge from the night before) and after it has cooled, pour/spread it over the top of the chilled cake. refrigerate the cake again to set the glaze.
serve the cake slightly chilled.
the verdict: you still with me?? to make a long story short, it turned out great with minimal injury to myself. it was super challenging, but definitely worth it if you are feeling like a… daring baker!
since i am silly, and did not halve this recipe like i should have considering my small boston family, i took half to work…
the buzz around the water cooler:
“did you make this? no you didnt. did you really? really? you made this?”
“wow. your talents are wasted here.”
“ah! this is so gourmet! and pretty!” (impressive statement considering that the cake began its life as a gloopy blob cake.)
not to toot my own horn or anything… but yay!!
(ps- very special thanks to nic and j for their seran wrapping advice, company keeping, and oohs and aahs throughout this entire ordeal!)
(pps- make sure you check out the other daring baker creations!)


This seems really involved, but delicious! Did you know that la joconde is what they call the mona lisa in french?
looks incredible lovely and so detail explained! wow
Welcome to the Daring Bakers! You jumped into the fire and did a fabulous job, you cake looks delicious. Well done………
Nice step-by-step pictures. The flavours you used must have made such a tasty Opera!
For our first challenge (did you just want to faint when you saw that recipe for the first time?) the fact that you took pictures along the way and managed to muddle through the recipe with flying colors, you deserve to toot your own horn. Great job!
Congrats on completing your first DB challenge! I love your step-by-step pics and the orange blossom is brilliant! You guys are all making me wish I didn’t have to miss this challenge!
Great first challenge! I liked your club-foot story… I wonder, which one of them has it? 🙂
Congrats on completing your first DB challenge! Your cake looks delish and thanks for all the wonderful photos
Your “cake of doom” looks delicious!
Shari@Whisk: a food blog
Beautiful cake.
I love your step by step!
Holy crap, we survived the first challenge! High five.
Awesome step-by-step pictures…. congrats on a successful opera cake. It looks amazing and I think it wants to jump into my tummy right about… now! Yay for becoming a DBer! Looking forward to seeing more of your amazing bakes in the future
You did an awesome job on your first challenge! I love you you took the pics – they turned out great!